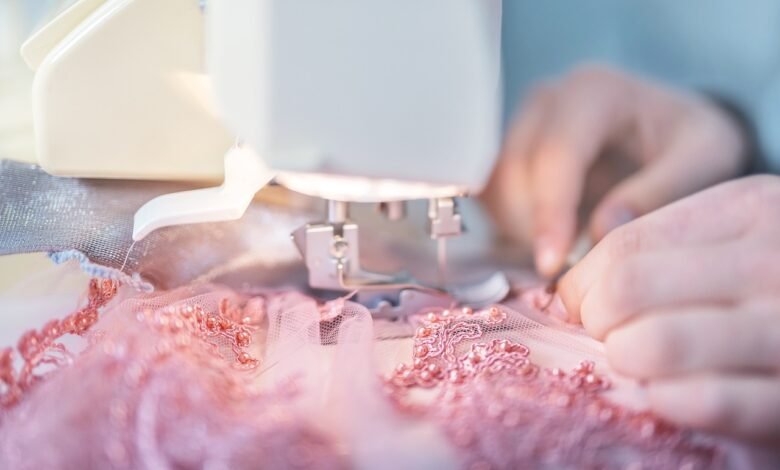
To sew, thread the needle, knot the end, and stitch through fabric in a straight line. Sewing involves joining fabric pieces with a needle and thread, creating various items like clothing, accessories, and home décor.
Whether you are a beginner or an experienced sewer, mastering basic sewing techniques is essential for successful projects. By understanding essential sewing tools and methods, you can unleash your creativity and design unique and personalized items. In this blog, we will explore the art of sewing, from fundamental stitches to advanced techniques, empowering you to embark on exciting sewing projects with confidence.
Embarking On Your Sewing Journey
Begin your sewing journey by learning basic stitches and techniques to create beautiful projects. Practice patience and precision for successful sewing endeavors. Mastering this craft opens up a world of creativity and self-expression.
Choosing The Right Fabric
When it comes to sewing, choosing the right fabric is crucial for the success of your project. The fabric you select will determine the overall look and feel of your finished piece, as well as its durability and functionality. To ensure you make the best choice, consider the following factors:
- Project Type: Determine what you will be sewing and select a fabric that suits the purpose. For example, if you’re making a dress, you might opt for lightweight, flowy fabrics like chiffon or silk. If you’re sewing a sturdy bag, you may prefer durable fabrics like canvas or denim.
- Fabric Composition: Pay attention to the composition of the fabric, as it can affect how it behaves and feels. Cotton is breathable and comfortable, while polyester blends are often more durable and wrinkle-resistant.
- Color and Pattern: Consider the color scheme and pattern that will complement your project. Think about the overall aesthetic you want to achieve and choose a fabric that aligns with your vision.
- Care Instructions: Check the care instructions for the fabric you’re considering. Some fabrics may require special care, such as dry cleaning or delicate washing, which could influence your decision.
Essential Sewing Tools And Equipment
To set yourself up for sewing success, it’s important to have the right tools and equipment on hand. Here are some essential items every beginner should have in their sewing kit:
- Sewing Machine: A reliable sewing machine is a must-have for any sewing enthusiast. Choose a machine that suits your skill level and budget, and make sure it comes with basic stitches and adjustable settings.
- Thread: Stock up on high-quality thread in various colors to match your fabric choices. Polyester or cotton thread is generally recommended for most sewing projects.
- Scissors: Invest in a pair of sharp fabric scissors specifically designed for cutting fabric. Keep them separate from your regular household scissors to maintain their sharpness.
- Pins and Needles: Have a collection of straight pins and hand sewing needles in different sizes. Pins will help you hold your fabric in place, while needles are essential for hand stitching and finishing touches.
- Measuring Tools: Accurate measurements are crucial in sewing. Get a measuring tape for body measurements and a ruler or measuring gauge for precise fabric measurements.
- Seam Ripper: Mistakes happen, and a seam ripper is your best friend when it comes to undoing stitches without damaging the fabric.
- Pincushion or Magnetic Pin Holder: Keep your pins organized and easily accessible with a pincushion or magnetic pin holder. This will prevent accidental pricks and save you time searching for pins.
Embarking on your sewing journey can be exciting and fulfilling. By choosing the right fabric and gathering essential tools, you’ll be well-prepared to bring your creative ideas to life. Remember, practice makes perfect, so don’t be discouraged if your first few projects don’t turn out exactly as planned. With time and experience, your sewing skills will continue to grow.

Credit: www.pinterest.com
Design Selection And Pattern Reading
When it comes to sewing, design selection and pattern reading are crucial skills to master. Whether you’re a novice or seasoned seamstress, understanding how to choose the right design and decipher pattern instructions is essential for creating beautiful and well-fitting garments. Let’s delve into the key aspects of design selection and pattern reading to help you elevate your sewing game.
Finding Your Style: Dress Patterns For Beginners
As a beginner, choosing the right dress pattern can be overwhelming. The key is to start simple. Look for dress patterns specifically designed for beginners, typically labeled as “easy” or “beginner-friendly.” These patterns often feature minimal pieces and straightforward construction, making them ideal for those new to sewing.
Consider your personal style and body shape when selecting a design. Opt for a pattern that reflects your fashion preferences, whether it’s a classic A-line silhouette, a flattering wrap dress, or a casual shift style. Choosing a design that resonates with your taste will motivate you throughout the sewing process.
Deciphering Pattern Symbols And Markings
When you open a sewing pattern, you’re greeted with a myriad of symbols and markings. Deciphering these instructions is essential for successfully bringing your garment to life. Refer to the pattern guide to understand each symbol’s meaning. Notable symbols include grainline indicators, dart placement marks, notches, and seam allowances.
Take time to familiarize yourself with the pattern’s instructions and markings before cutting your fabric. Using a highlighter, mark key points and symbols on your pattern pieces to ensure you follow the instructions accurately. By comprehending pattern symbols, you’ll be equipped to tackle the sewing process with confidence.
Mastering Basic Sewing Techniques
Learning to sew can be an incredibly rewarding skill to have, allowing you to create and repair your own clothes, accessories, and home decor. To get started on your sewing journey, it’s essential to master the basic sewing techniques. In this blog post, we will guide you through the important steps of threading the needle and provide tips on practicing stitches and seams.
Threading The Needle: A Step-by-step Guide
Threading the needle is the first step in any sewing project. Follow these simple steps to ensure a smooth and frustration-free experience:
- Hold the end of the thread between your thumb and index finger, allowing a few inches to hang loose.
- Insert the thread through the eye of the needle, gently pushing it until it comes through.
- If you find it challenging to thread the needle, try moistening the end of the thread or using a needle threader tool.
- Once the thread is through the eye of the needle, pull it through, leaving an equal length of thread on both sides.
Stitches And Seams: Practice Makes Perfect
Now that you have successfully threaded the needle, it’s time to practice various stitches and seams to enhance your sewing skills. Remember, practice makes perfect, so don’t be discouraged if your initial stitches aren’t flawless. Here are a few key stitches and seams to practice:
Straight Stitch
The straight stitch is the most basic and commonly used stitch in sewing. It creates a straight line and is perfect for hemming, sewing seams, and attaching fabric pieces together. To create a straight stitch:
- Place the fabric under the needle, aligning the edge with the desired seam allowance.
- Lower the presser foot and start sewing, keeping the fabric aligned and guiding it gently through the machine.
- Remember to backstitch at the beginning and end of each seam to secure the stitches.
Zigzag Stitch
The zigzag stitch is useful for preventing fabric edges from fraying and adding decorative touches to your projects. To create a zigzag stitch:
- Select the zigzag stitch setting on your sewing machine.
- Place the fabric under the needle, aligning the edge with the desired seam allowance.
- Lower the presser foot and start sewing, guiding the fabric to create a zigzag pattern.
- Experiment with different stitch widths and lengths to achieve the desired effect.
By practicing these basic stitches and seams, you will gain confidence in your sewing abilities and be well on your way to becoming a skilled seamstress. Remember to start with simple projects and gradually challenge yourself with more complex designs. Happy sewing!
Cutting And Preparing Your Fabric
When it comes to sewing, one of the most crucial steps in creating a garment or project is cutting and preparing the fabric. This step sets the foundation for the entire sewing process, so it’s important to approach it with precision and care. In this section, we will explore two key aspects of cutting and preparing your fabric: laying out the pattern pieces and tips and tricks for achieving precision in cutting.
Laying Out The Pattern Pieces
Before you start cutting your fabric, it’s essential to lay out the pattern pieces correctly. This ensures that you utilize the fabric efficiently and minimize wastage. Here’s a step-by-step guide to laying out the pattern pieces:
- Start by carefully reading the instructions provided with your sewing pattern. Pay attention to any layout diagrams or specific instructions for placing pattern pieces on the fabric.
- Identify the grainline and selvedge of your fabric. The grainline indicates the direction of the fabric’s threads, while the selvedge is the finished edge of the fabric. Aligning the pattern pieces with the grainline is crucial for ensuring proper fit and drape of the final garment.
- Next, determine the pattern’s placement on the fabric, taking into consideration any directional prints or design elements you want to highlight. Use pattern weights or pins to secure the pattern pieces in place.
- Ensure that you have enough space around each pattern piece to accommodate seam allowances and any necessary adjustments or alterations.
- Double-check that all pattern pieces are positioned correctly before moving on to the cutting stage. Once you’re satisfied with the layout, you’re ready to start cutting your fabric.
Precision In Cutting: Tips And Tricks
Cutting your fabric with precision is key to achieving professional-looking results. Here are some tips and tricks to help you cut accurately:
- Use sharp fabric scissors or a rotary cutter with a fresh blade to ensure clean, precise cuts.
- Take your time and cut slowly, following the outline of the pattern pieces. Rushing can lead to uneven edges or mistakes.
- If you’re working with slippery or delicate fabrics, consider using pattern weights or fabric stabilizers to keep the fabric in place and prevent shifting during cutting.
- Mark any notches, darts, or other important points on the fabric using tailor’s chalk or fabric markers. These markings will guide you during the sewing process.
- For curved or intricate cuts, consider using small, sharp scissors or a pair of fabric shears with serrated blades for better control.
- Regularly check your cutting accuracy by aligning the pattern pieces or using a ruler to measure seam allowances. This helps ensure consistency throughout your project.
By following these tips and taking the time to cut your fabric accurately, you’ll set yourself up for success in your sewing endeavors. Remember, precision in cutting is the first step towards a beautifully crafted garment or project.
Assembling The Dress
Assembling the dress is an exciting phase where all the individual pieces come together to create a beautiful garment. This step requires precision, attention to detail, and a methodical approach to ensure a perfect outcome. Let’s explore the crucial steps involved in assembling the dress.
Sewing The Pieces Together
Sewing the pieces together is a critical stage in the dressmaking process. It involves aligning the various sections of the dress, such as the bodice, sleeves, and skirt, and meticulously stitching them together. This step demands careful handling of the fabric and a keen eye for symmetry.
Ensuring Proper Fit: Adjustments And Alterations
Ensuring proper fit: adjustments and alterations are essential to achieve a garment that fits impeccably. During this phase, the dress is tried on to identify any areas that require adjustments. Common alterations include hemming, taking in or letting out seams, and refining the overall silhouette.
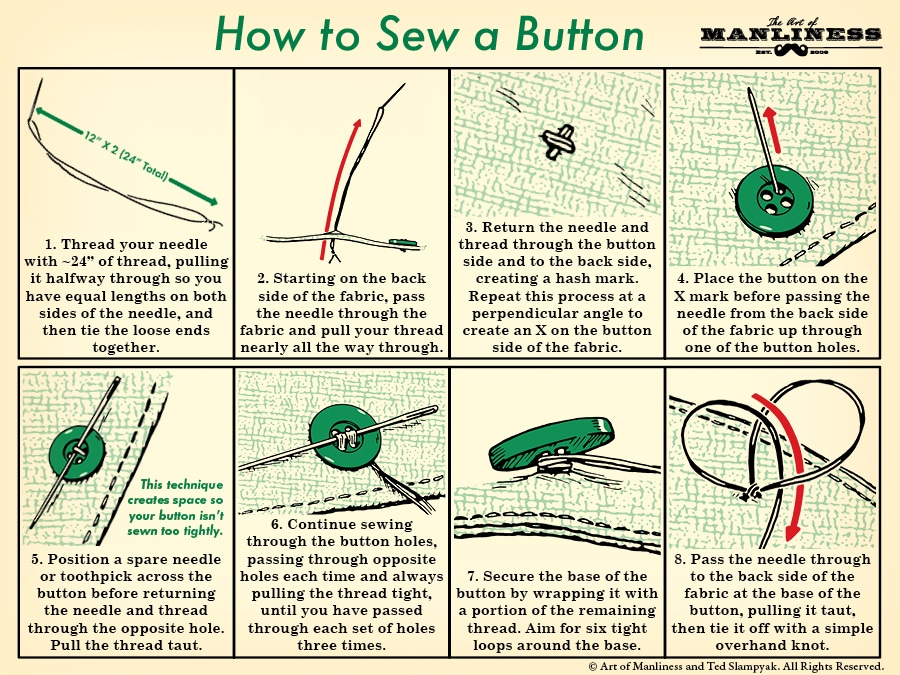
Credit: www.artofmanliness.com
Adding The Finishing Touches
Adding the finishing touches to a sewing project can elevate it from good to great. Whether it’s hemming a dress for a polished look or installing zippers and buttons, these final steps can make all the difference in the finished product.
Hemming The Dress For A Polished Look
Hemming a dress is the final step to achieve a polished and professional look. Start by ironing the hem to create a crisp edge. Then, fold the fabric under and secure it with pins. After that, sew along the fold line using a matching thread color. Finally, press the hem again to ensure a smooth and seamless finish.
Installing Zippers And Buttons
When it comes to adding zippers and buttons, precision is key. Begin by marking the placement of the zipper or buttons using fabric chalk or pins. Next, carefully sew along the markings using a zipper foot for zippers or a buttonhole foot for buttons. Test the functionality of the zipper or buttons before completing the final stitching.
Decorative Elements And Personalization
When it comes to adding your personal touch to sewing projects, Decorative Elements and Personalization play a key role. By incorporating unique details, you can elevate your creations and make them stand out.
Embellishing Your Dress With Trims And Appliqués
Add trims for a pop of color and texture. Appliqués can create dimension and interest.
Creating Unique Details With Embroidery
Embroider personalized designs for a one-of-a-kind look. Stitch intricate patterns for a special touch.
Caring For Your Handmade Dress
When it comes to caring for your handmade dress, proper maintenance is crucial.
Proper Washing And Ironing Techniques
Follow care instructions to wash and iron your dress correctly.
Storage Solutions To Maintain Shape And Quality
Store dress in a cool, dry place to prevent damage and maintain its quality.

Credit: www.youtube.com
Frequently Asked Questions
What Are The Essential Tools Needed For Sewing?
To start sewing, you’ll need basic tools such as scissors, pins, needles, thread, measuring tape, and a sewing machine. Optional tools include a rotary cutter, cutting mat, and seam ripper.
How Do I Choose The Right Fabric For My Sewing Project?
Consider the weight, drape, and fiber content of the fabric. For beginners, it’s best to start with stable fabrics like cotton or linen. Choose a fabric that complements your pattern and is easy to work with.
How Can I Improve My Sewing Skills?
Practice regularly and try new techniques. Take sewing classes, join a sewing group, or watch online tutorials. Focus on accuracy, speed, and attention to detail. Don’t be afraid to make mistakes and learn from them.
How Do I Troubleshoot Common Sewing Problems?
If the thread keeps breaking, check the tension and needle. If the fabric puckers, adjust the stitch length and tension. If the seams are uneven, reposition the fabric and adjust the seam allowance. Always refer to your sewing machine manual for troubleshooting tips.
Conclusion
With these step-by-step instructions, learning how to sew can be a fun and rewarding experience. Remember to start with simple projects and gradually work your way up to more complex ones. Practice makes perfect, so don’t be discouraged if you make mistakes along the way.
With patience and dedication, you can become a skilled seamstress and create beautiful pieces for yourself and others. Happy sewing!