To enable secure boot, access your computer’s BIOS settings and turn on the secure boot option. Secure boot helps protect your device from malware attacks by only allowing trusted software to run during startup.
Enabling secure boot on your computer is an important step in securing your device from potential malware attacks. This feature ensures that only trusted software is allowed to run during startup, which can help prevent unauthorized access and data breaches.
To enable secure boot, you’ll need to access your computer’s BIOS settings and turn on the secure boot option. Once enabled, your computer will only boot from trusted sources, making it more difficult for malicious software to gain access to your system. Overall, enabling secure boot is a simple yet effective way to enhance the security of your computer and protect your sensitive data.
Introduction To Secure Boot
Secure Boot enhances system security by preventing unauthorized software from running during startup. To enable Secure Boot, access the BIOS settings and locate the Secure Boot option. Then, set it to “Enabled” to ensure only trusted software is loaded, safeguarding against malware attacks and unauthorized system access.
Secure Boot is a technology that helps to ensure the security of your computer’s operating system. It is a security feature that is designed to prevent the loading of any software or operating system that is not trusted or authorized by the system manufacturer. Secure Boot is a feature that is available on most modern computers, including those that run on Windows and Linux operating systems. In this blog post, we will discuss the role of Secure Boot in system security and the benefits of enabling Secure Boot on your computer.
The Role Of Secure Boot In System Security
Secure Boot plays a vital role in ensuring the security of your computer’s operating system. It is a feature that helps to prevent the loading of any unauthorized software or operating system. Secure Boot works by checking the digital signature of the operating system and its components during the boot process. If the digital signature is not valid, the system will not load the software or operating system. This feature helps to prevent malware and other malicious software from loading on your computer, which can compromise the security of your system and your data.
Benefits Of Enabling Secure Boot
Enabling Secure Boot on your computer has several benefits. Firstly, it helps to ensure the security of your computer’s operating system. This feature prevents malware and other malicious software from loading on your system, which can protect your data and personal information. Secondly, enabling Secure Boot can help to improve the performance of your system by preventing unauthorized software from running in the background. Finally, enabling Secure Boot can help to extend the lifespan of your computer by preventing unauthorized software from corrupting your system files. In conclusion, Secure Boot is a critical security feature that helps to prevent the loading of unauthorized software or operating systems on your computer. By enabling Secure Boot, you can ensure the security of your system, improve performance, and extend the lifespan of your computer.
Credit: softkeys.uk
Prerequisites For Enabling Secure Boot
Before you can enable Secure Boot on your system, there are a few prerequisites that need to be met. These include checking system compatibility and updating your BIOS/UEFI firmware. Let’s take a closer look at each of these steps.
Checking System Compatibility
First and foremost, it’s crucial to ensure that your system is compatible with Secure Boot. This security feature is supported by most modern computers, but it’s always a good idea to double-check. To do this, follow these simple steps:
- Access your computer’s BIOS/UEFI settings by restarting your system and pressing the designated key (usually F2 or Delete) during the boot process.
- Once in the BIOS/UEFI settings, navigate to the “Security” or “Boot” section.
- Look for an option labeled “Secure Boot” or “UEFI Boot.” If you find it, your system is compatible with Secure Boot.
If you don’t see the option, it’s possible that your system doesn’t support Secure Boot. In such cases, you may need to update your computer’s firmware or consider upgrading to a newer model that supports this security feature.
Updating Bios/uefi Firmware
If your system is compatible with Secure Boot, the next step is to ensure that your BIOS/UEFI firmware is up to date. Firmware updates often include bug fixes, performance improvements, and security enhancements. Here’s how you can update your firmware:
- Visit the manufacturer’s website and locate the support page for your specific computer model.
- Look for the latest BIOS/UEFI firmware update for your system.
- Download the firmware update file and save it to a USB drive.
- Restart your computer and access the BIOS/UEFI settings.
- Navigate to the “Advanced” or “Update & Security” section, depending on your system.
- Select the option to update the firmware using the USB drive and follow the on-screen instructions.
- Once the update is complete, restart your computer to apply the changes.
Updating the BIOS/UEFI firmware can be a critical step in enabling Secure Boot, as it ensures that your system has the latest security patches and features. Remember to always follow the manufacturer’s instructions carefully to avoid any potential issues.
With the prerequisites completed, you’re now ready to proceed with enabling Secure Boot on your system. Stay tuned for our next blog post, where we’ll guide you through the process step-by-step.
Backing Up Your System
When it comes to computer security, enabling Secure Boot is an essential step. However, it is equally important to back up your system to prevent any potential data loss. In this section, we will discuss the importance of data backup and recommended backup solutions.
Importance Of Data Backup
Data backup plays a crucial role in safeguarding your valuable files and documents. Whether you encounter a hardware failure, malware attack, or accidental deletion, having a recent backup ensures that you can easily restore your data without any hassle. It provides you with peace of mind, knowing that your important information is safe and can be retrieved when needed.
Recommended Backup Solutions
There are several reliable backup solutions available that can suit your specific needs. Here are a few options to consider:
- External Hard Drive: Investing in an external hard drive allows you to create a physical backup of your system. Simply connect the drive to your computer and use backup software to create regular backups. It offers convenience and portability, allowing you to store your backup securely offsite.
- Cloud Storage: Cloud storage services such as Dropbox, Google Drive, or Microsoft OneDrive provide a convenient way to back up your data. Simply upload your files to the cloud and access them from any device with an internet connection. Ensure to choose a reputable and secure cloud storage provider to protect your sensitive information.
- Network Attached Storage (NAS): NAS devices offer a centralized storage solution for multiple devices on your network. With a NAS, you can schedule automatic backups and access your files from various devices. It provides an extra layer of data protection and flexibility.
Remember, regardless of the backup solution you choose, it is essential to regularly update your backups to ensure that you have the most recent version of your files. Additionally, test your backups periodically to verify their integrity and ensure they can be restored successfully if needed.
Entering The Bios/uefi Settings
Entering the BIOS/UEFI settings is crucial for enabling Secure Boot on your computer. Secure Boot is a security feature that helps prevent unauthorized operating systems and malware from loading during the system start-up process.
Restarting Your Computer
To access the BIOS/UEFI settings, you will need to restart your computer. Ensure that all ongoing tasks are saved and closed before initiating the restart process.
Accessing The Bios/uefi Menu
Once your computer has restarted, you will need to access the BIOS/UEFI menu. This can typically be achieved by pressing a specific key or combination of keys during the initial boot-up process. The specific key or key combination varies depending on the manufacturer of your computer or motherboard. Common keys include F2, F10, F12, or the “Delete” key.
If you are unsure of the correct key to press, refer to the computer’s manual or the manufacturer’s website for guidance. It’s important to act swiftly, as the window of opportunity to access the BIOS/UEFI menu is often brief.
Navigating The Bios/uefi Interface
To enable Secure Boot, navigate to the BIOS/UEFI interface and locate the Security or Boot options. Then, enable the Secure Boot feature to enhance system security and prevent unauthorized firmware and operating systems from loading during the boot process.
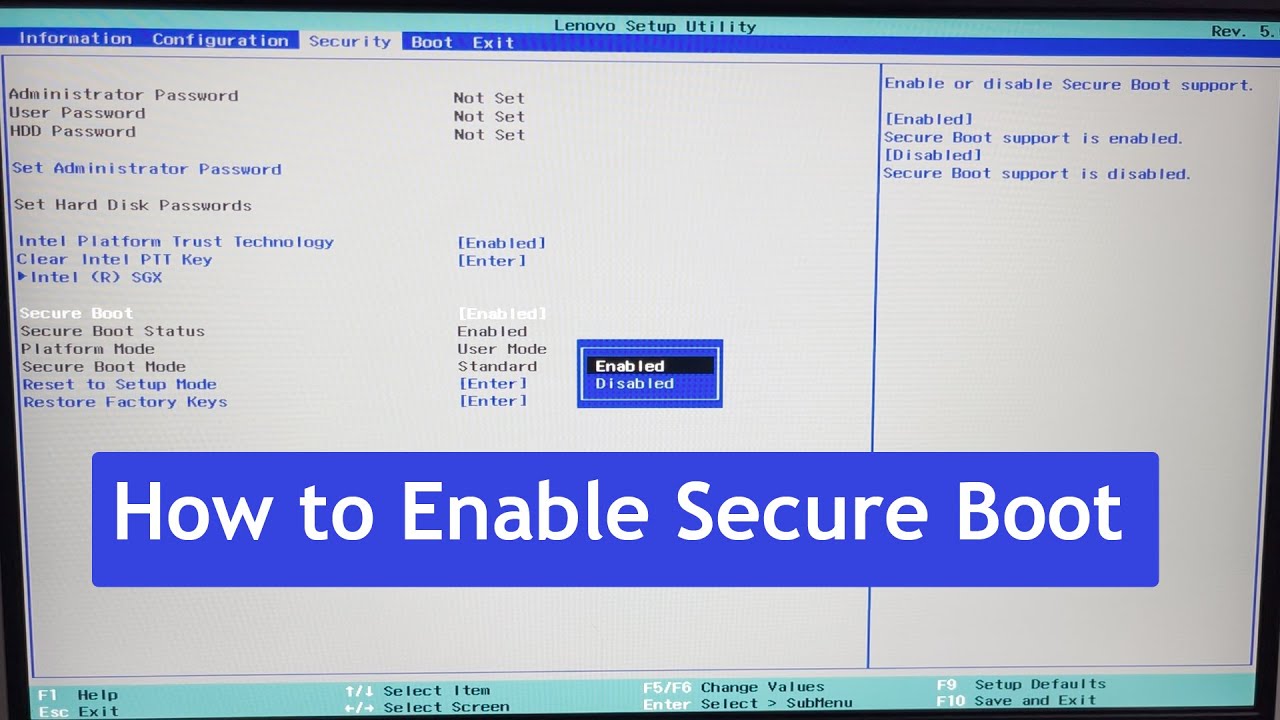
Locating The Secure Boot Option
In order to enable Secure Boot on your computer, you will need to navigate through the BIOS or UEFI interface. The first step is to locate the Secure Boot option, which may vary depending on the manufacturer and model of your computer.
Here’s a simple guide to help you locate the Secure Boot option:
- Start by restarting your computer. As it boots up, look for a key or combination of keys to access the BIOS or UEFI settings. This is typically displayed on the screen during the boot process, such as “Press F2 to enter BIOS.”
- Once you have identified the correct key or combination of keys, press it immediately to access the BIOS or UEFI settings.
- Within the BIOS or UEFI settings, you will find various menus and options. Look for a menu related to “Security” or “Boot Options.” This is where the Secure Boot option is usually located.
- Navigate through the menus using the arrow keys on your keyboard. Look for the option labeled “Secure Boot” or something similar.
- Once you have located the Secure Boot option, you can enable it by selecting it and changing the setting to “Enabled.”
- Save your changes and exit the BIOS or UEFI settings. Your computer will then restart with Secure Boot enabled.
Understanding Bios/uefi Layouts
The layout of the BIOS or UEFI interface can vary depending on the manufacturer and version. However, there are some common elements that you should be familiar with to navigate through the settings effectively.
Here are a few key elements to understand:
- Main Menu: This is the main screen of the BIOS or UEFI interface. It typically displays basic information about your computer, such as the model number and BIOS version.
- Navigation: Use the arrow keys on your keyboard to navigate through the menus and options. The Enter key is used to select an option, and the Esc key is used to go back to the previous menu.
- Submenus: The main menu is usually divided into different submenus, such as “Security,” “Boot Options,” “Advanced,” and more. These submenus contain specific settings related to different aspects of your computer.
- Settings: Within each submenu, you will find various settings that can be adjusted. These settings may include options related to Secure Boot, boot order, system time, and more.
- Save and Exit: Once you have made changes to the settings, you will need to save your changes and exit the BIOS or UEFI interface. Look for an option such as “Save and Exit” or “Exit Setup.” Select this option to save your changes and restart your computer.
By understanding the layout of the BIOS or UEFI interface, you can easily navigate through the settings and locate the Secure Boot option to enable it for enhanced security.
Configuring Secure Boot Settings
Enabling Secure Boot
To enable Secure Boot, access the BIOS or UEFI settings on your computer. Navigate to the Secure Boot option and select “Enabled.” Save the changes and exit the settings to activate Secure Boot.
Setting Up Key Management
After enabling Secure Boot, it’s essential to manage the keys. Access the Secure Boot configuration and import the necessary keys, such as Microsoft UEFI CA key, to ensure the system only boots trusted operating systems and drivers.
Saving Changes And Exiting Bios/uefi
To enable Secure Boot and save changes in BIOS/UEFI, follow these steps: access the BIOS/UEFI settings, navigate to the Secure Boot option, enable it, and then save the changes before exiting. This ensures that your system boots up securely and protects against unauthorized firmware or software modifications.
Before saving changes in the BIOS/UEFI, review settings carefully:
- Check boot order and secure boot status.
- Verify any changes made are correct.
To exit the BIOS/UEFI after saving changes:
- Locate the “Save & Exit” or similar option.
- Confirm saving changes and exit.
- Select “Yes” or “Save” to apply changes.
- Choose “Exit” to leave BIOS/UEFI and reboot.
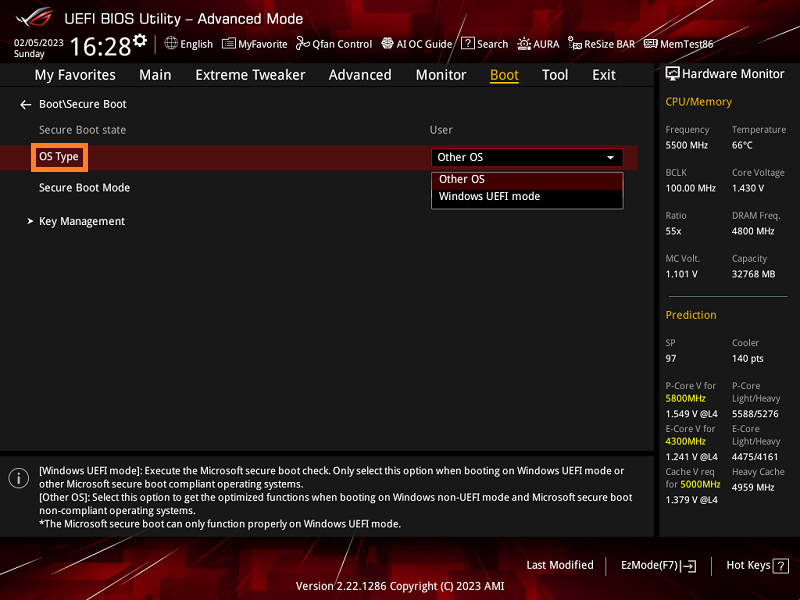
Credit: www.asus.com
Verifying Secure Boot Activation
To enable Secure Boot, first verify its activation status in the system’s BIOS settings. Access the BIOS menu during startup and navigate to the Secure Boot option. Ensure that it is set to “Enabled” to enhance system security against unauthorized software and firmware.
Checking Boot Status In The Operating System
To verify Secure Boot activation, access the operating system settings.
- Open the system settings menu.
- Locate the Security or Boot Configuration section.
- Look for an option related to Secure Boot.
- Ensure that Secure Boot is enabled.
Troubleshooting Common Issues
If you encounter issues with Secure Boot activation, follow these steps:
- Check for BIOS updates.
- Verify that the operating system supports Secure Boot.
- Disable and re-enable Secure Boot.
- Reset BIOS settings to default.
Maintaining Secure Boot
Enabling Secure Boot is crucial for maintaining the security of your system. By following a few simple steps, you can ensure that only trusted software is loaded during the boot process, protecting your device from potential threats and unauthorized access.
Safeguard your system with Secure Boot activation.
Regularly Updating System Software
Keeping your system software up to date is crucial in maintaining Secure Boot. Regular updates patch vulnerabilities, enhancing overall security.
Staying Informed On Secure Boot Practices
Stay informed on best practices for Secure Boot to ensure optimal protection. Being aware of latest trends is essential.
Frequently Asked Questions
What Is Secure Boot And Why Is It Important?
Secure Boot is a security feature that ensures the integrity of the boot process. It helps prevent unauthorized operating systems and malware from loading during the system startup, thereby enhancing the overall security of the device.
How Do I Check If Secure Boot Is Enabled On My Device?
To check if Secure Boot is enabled, restart your computer and access the BIOS or UEFI settings. Look for the Secure Boot option and verify its status. If it’s enabled, your system is protected by Secure Boot.
Can I Enable Secure Boot On An Older Computer?
Enabling Secure Boot on older computers may not be possible, as it requires UEFI firmware. If your system lacks UEFI support, you may need to upgrade the hardware or utilize alternative security measures to enhance your device’s protection.
Conclusion
In a nutshell, enabling Secure Boot is crucial for enhancing system security. By following the steps outlined in this guide, you can protect your device from unauthorized access and malware threats. Prioritize security and safeguard your system by activating Secure Boot today.
Your digital safety matters!